If your basement keeps collecting water or you plan a remodel, installing a sump pump protects your belongings and foundation by actively removing excess water before it becomes costly damage. A properly installed sump pump channels groundwater away from your home, reducing flood risk and giving you reliable, long-term protection.
This post Sump Pump Installation walks you through what a sump pump does, how to choose the right system, and a clear, step-by-step installation process you can follow or discuss confidently with a pro. Expect practical tips on pit preparation, pump selection, discharge routing, power and backup options, and testing so you can prevent surprises and keep your basement dry.
Understanding Sump Pump Installation
You will learn the main pump types, the specific tools and materials you’ll need, and how to pick the best pit location to ensure reliable operation and minimal basement disruption.
Types of Sump Pumps
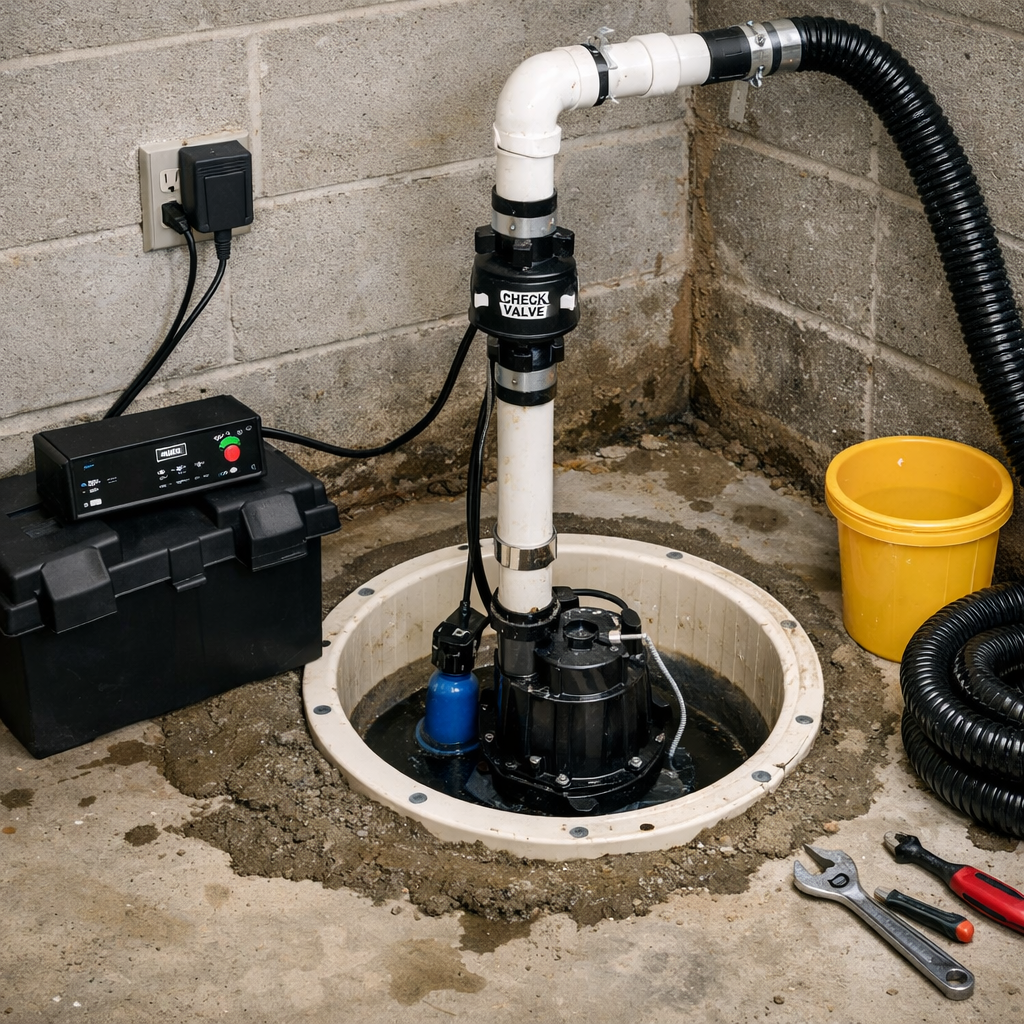
Two primary sump pump designs serve most basements: submersible and pedestal.
A submersible pump sits inside the sump pit, fully sealed against moisture, and typically runs quieter and handles higher flow rates. Choose a submersible model when space in the pit is limited or when you want lower noise and better debris handling.
A pedestal pump has the motor mounted above the pit and a vertical shaft that connects to the impeller. Pedestal units are easier to service and cost less upfront but are louder and more exposed to basement humidity.
Also consider battery backup and water-powered backup options. Battery backups keep the pump running during power outages; capacity depends on battery size and pump draw. Water-powered backups need municipal water pressure and will increase your water use during activation.
Required Tools and Materials
Prepare these items before you begin:
- Tools: shovel, wet/dry vacuum, drill with masonry bit, level, tape measure, pipe cutter, wrenches, screwdriver set, caulk gun.
- Materials: sump pit liner (6–24 in. diameter depending on pump), PVC discharge piping (1¼–2 in. depending on pump outlet), check valve, hose clamps, primer/solvent cement, gravel (coarse, clean), silicone or waterproof sealant, electrical GFCI outlet or heavy-duty grounded receptacle.
Also gather safety gear: gloves, eye protection, and dust mask.
If installing a battery backup, include a deep-cycle marine battery, battery box, and appropriate charger. Confirm local codes for required permits, discharge routing, and backflow prevention before buying materials.
Selecting the Best Location
Place the sump pit at the lowest point of the basement or crawlspace where water naturally collects.
If one area isn’t clearly lowest, inspect during heavy rain or run water tests to identify the drainage pattern. Position the pit away from walls that may interfere with discharge piping routing, while keeping it accessible for maintenance.
Maintain at least 6–12 inches clearance around the pump for inspection and removal.
Ensure you can route a straight or gently sloped discharge line to the exterior with a check valve installed above the pit to prevent re-entry. Finally, verify electrical access: the pump should be within reach of a dedicated GFCI outlet, ideally on a separate circuit to avoid nuisance trips.
Step-by-Step Sump Pump Installation Process
You will prepare a clean, correctly sized pit, position and secure the pump, run a watertight discharge line to a safe outlet, and verify operation with testing and basic troubleshooting.
Preparing the Sump Pit
Dig or confirm a pit that fits the pump and a 20–30 gallon basin if space allows. The pit should be level, at least 18–24 inches deep for most submersible pumps, and large enough to accommodate the pump’s float movement without obstruction.
Line the pit with a rigid plastic or concrete basin; set the basin so its top sits slightly below the finished basement floor to allow a sealed lid. Add a few inches of gravel under the basin for drainage and to help it sit plumb.
Clean the basin rim and surrounding concrete to ensure a watertight seal when you install the lid. Mark the discharge location on the wall or floor before drilling to avoid rework.
Mounting and Securing the Pump
Place the pump inside the basin and position it on the gravel or pedestal as recommended by the manufacturer. If the pump uses a base clamp or bracket, tighten it per instructions to prevent tilt during operation.
Install the float switch so it moves freely without contacting the basin wall or other hardware; adjust float height to match cut-in and cut-out levels you need. Use stainless hardware for any clamps and secure electrical conduit or cable to avoid strain on the pump cord.
If you use a vertical standpipe or a non-submersible (pedestal) model, anchor the standpipe to the basin or floor per manufacturer specs. Keep the pump accessible for future removal and maintenance.
Connecting Discharge Lines
Select rigid PVC or Schedule 40 pipe for the discharge line; use glued solvent-weld fittings on the pump discharge to ensure leak-free joints. Include a check valve within 12 inches of the pump outlet to prevent backflow into the basin.
Slope horizontal runs away from the house at 1/8″–1/4″ per foot to shed water, and minimize low spots where water can pool. Run the discharge line through a wall or foundation bulkhead using a properly sized hole; seal around the pipe with hydraulic cement or expanding foam rated for exterior use.
Terminate the line at least 10 feet from the foundation or to a storm drain following local codes. Secure the pipe with straps every 3–4 feet and install a frost-proof or buried outlet if you’re in a freeze-prone area.
Testing and Troubleshooting
Plug the pump into a dedicated GFCI-protected circuit and pour water into the basin to trigger the float. Observe the pump’s startup time, check valve operation, and full discharge; listen for unusual noises like grinding or air-bound rattles.
Verify the pump turns off at the correct water level and that no leaks occur at fittings. If the pump runs continuously, check for a stuck float, jammed impeller, or oversized discharge restriction. If the pump fails to start, test the outlet with a multimeter, inspect the power cord and float switch wiring, and confirm the impeller is not clogged.
Keep a checklist: float free movement, secure fittings, proper valve orientation, correct discharge slope, and stable electrical supply. Address issues promptly to prevent rapid wear or basement flooding.